As we are not fully immersed in the New Year – not yet (today is 7th of January – some folks celebrate the day of their name – John, the Saint), and also because today is Sunday, I thought it would be appropriate to come up with something off regular topics for this blog.
One of my hobbies is music. One type of music that I love is “blues”. From music world I have decided to share and talk about a moment that I enjoyed, e.g. a video in which both Master and apprentice work side by side to create something that makes joy – at least for my ears.
If the reader does not like music, or maybe he/she likes music, but not exactly this type (blues), then you have the choice to stop reading here.
What is interesting also is besides the music moment. Thus, I saw some similarities with the real world. So, a master musician than teaches his apprentice and gives him confidence. Like an expert in any field (say Information Technology, programming languages) passes knowledge to a junior and teaches him how to – not only – perform his or her best upon teachings, but to be confident that he/she is good at what he/she is doing. Below is the video and on the right side is what the Master told the apprentice before the song starts to be played by both musicians.
“THE BETTER YOU GET, THE HARDER YOU WORK …”
“YOU CAN’T BE GOOD THAN WHAT YOU ARE, YOU ARE ALREADY PRETY GOOD …”
(Albert King – the Master – a well know legend of blues, encouraging the apprentice in the first 30 seconds of this video)
The apprentice that was thus motivated by his master, after he started playing with Albert King , he has – during his performance – (at around minute 5:00 of the video) his own creation moment, so the master likes what he hears (the product made by the junior) and thus asks him: “Once more, once more!“
Moral of the story
Every time the mentor encourages the junior and believes in him/her, something more than what the apprentice learnt and can produce rises, something valuable to the extent the master might be surprised in a good way. This creates confidence and advancement in one’s career.
Apprentice: Stevie Ray Vaughan
Full video (recorded live for television in 1983):
–about a fresh token deal between Lido Finance and Dragonfly–
Token deal – yes, talking about a crypto-token (that is different than a crypto-currency). The difference is that crypto-token has not its own blockchain, while crypto-currency has one (on which it is issued).
Difference from a start up: chasing down funds on classic start up is pursued by a handful of persons, be them the founders, a professional M&A agent or alike. Within DAOs, the deals are made transparent to the rest of community.
Who is the “community”?
Community refers, in this case, to anyone who holds a governance token in the respective DAO.
A specific DAO deal case analyzed
Lido Finance is a staking service (staking is a way of earning rewards for holding certain crypto assets – this definition is extracted from this source -> coinbase.com).
Lido is currently seeking a longer runway by selling off 2% of the total supply of its native token LDO.
If the product is good and gaining traction but not quite strong enough to stand on its own; and if sustainability is not the goal, then continued, upward growth is another good reason.
One could imagine, in the crypto-currencies space organisations are born and they issue their own crypto- asset (be it crypto-currency or crypto-token), so Lido Finance makes no exception. Therefore, LDO is supposed to be sold in exchange for stablecoins (a stablecoin is a type of crypto-currency whose value is tied to an outside asset, such as the U.S. dollar or gold – this definition is extracted from this source -> coindesk.com).
Why selling LDO token?
It sound similar to traditional finance: a company selling from its own shares to obtain cash.
Basically, obtaining non-volatile (crypto) assets amid the ongoing bear market would allow for this endeavor (this is a start up, right?) to continue be financed for roughly two more years of operation.
This is where community enter into their role:
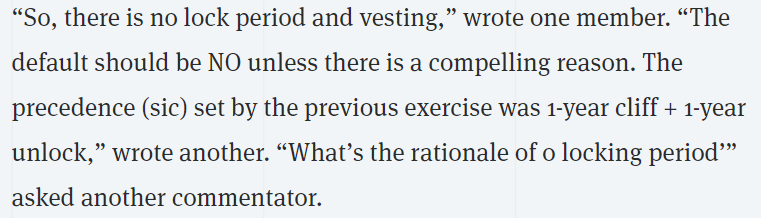
June 3: a broader proposal was the first (from a Lido developer) who suggested “to sell 10,000 ETH of Treasury funds to DAI” (DAI is a stablecoin). ETH is Ether, the native crypto-currency of Ethereum blockchain.
The definition of “Treasury” term: a treasury system is a community controlled and decentralised collaborative decision-making mechanism for sustainable funding of the blockchain development and maintenance; during each treasury period, project proposals are submitted, discussed, and voted for; and top- ranked projects are funded from the treasury (source: https://www.lancaster.ac.uk/staff/zhangb2/treasury.pdf)
Later on: to sell LDO tokens (from community discussions)
July 27: the proposal was again refined:
Reacting to this, the community commented. So, because the proposal indicated that the “acquired tokens will be unlocked” (meaning that as soon as the holdings were purchased, most likely by Dragonfly, they could be sold at will) the community said the followings:
Reading through each step from June 3 until July 27 provides a really interesting case study into crypto governance.
Note: cloud environment is charging by second / hour
When exploring the relevant AWS services, if one wants to employ an IT architecture that is fit for purpose and fit for use, inevitably a solution architect tries different alternatives until the final solution architecture is found for the given business goal.
For example, when dimensioning the resources needed to support the business flow, as far as computers are concerned (in fact servers), there are several alternatives to pick from as follows (the below list is not exhaustive):
EC2 on-demand instances
EC2 reserved instances
EC2 spot instances
Note: EC2 instance = a virtual machine a.k.a a virtual server (there is a discussion here though, as the term ‘server’ could be also a piece of software as opposite to the ‘classic’ meaning of server that commonly is seen as a computer / a physical piece of hardware on a rack of servers/machines).
Each one of the above types of instances qualifies for various purposes.
For example, on-demand EC2 instances are needed for a critical situation whereby availability of the business process is critical (for example a database replication). Spot EC2 instances could be used for say processing images whereby interruption is not important (you can re-take the processing of that image at a later stage without much impact on the underlying business process).
Interruption? Yes, spot instances could dissapear (automatically terminated / stopped by Amazon when the price increases unexpectedly).
Why one might chose a spot EC2 instance if it could have an impact on availability? The major difference between EC2 on-demand and spot EC2 is the pricing (the IT architect may chose one in order to make significants savings, provided that the nature of business allows to include in the landscape such a thing).
The process when chosing an EC2 spot instance is this: you know from the start that spot instances could not be available by reasons independent of your will. Still, you want to take the risk to employ such an instance because the price is … way too low (6-8 times than the EC2 reserved instances). So, at the beginning you bid a price for a spot EC2 instance and you are aware that when that price cannot cover the market price, Amazon gets that EC2 instance away from you (it leaves you however 2 – yes, two – minutes to react).
Ok, so no matter the type of instances picked, the IT architect is reponsible to chose an architecture able to accommodate the nature and complexity of company’s business at best prices offered by the cloud.
Finally, after one or many drafts of IT architecture, the architect decides on a pool of EC2 instances. Once the final IT architecture is ready, if he/she overlooks an EC2 instance that is not included therein, that forgotten one might continue to be seen by Amazon as a resource needed (as long as it is not terminated) and therefore charges will be incurred for this instance.
That is why it is highy recommended to use a method to keep the costs under control and one of the recommended ways to achieve this objective could be by implementing … alerts.
Note: Why an IT architect might overlook to terminate an EC2 instance ? It may happen he/she might have a good intention, meaning after many tries, such instance might have on it valuable data. So, before to terminate that instance the intention was to 1) copy first the data and 2) then cancel that instance. But maybe between step 1 and 2 something happened and that EC2 instance remains unterminated.
Anyway, alerts are a good thing.
Feature in AWS: creating a budget thresold comes with the nice option of setting an alert when budget is exceeded.
How to set up a buget thresold in order to keep costs under control?
The answer is there is the option to set budget(s) – see in the above image the button “Create budget”. This option comes with the feature to send an email when the budget is exceeded.
I like especially this couple of possibilities, as follows:
the alert could be set at a threshold that represents x% of the budget;
alerts could be set for both actual budget and forecasted* budget (or for only one of them).
*) Amazon makes a forecast based on the past levels of costs (registered in consuming of resources)
Why alerts are so important?
To answer this question, I believe first we have to find the answer to another question, i.e. what could go wrong?
Let’s explore another example besides the one already mentioned (i.e. I have talked several paragraphs above about the possibility to overlook to terminate or – at least – to stop an unused instance).
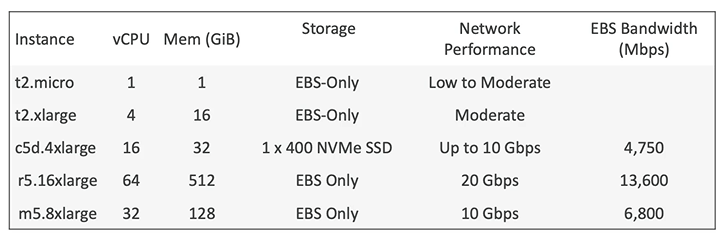
Among other decisions that have to be made, the IT architect has to take into consideration the type of instance to serve best the nature of business. Here below there is a list of the instance types available in AWS (categorized by the main purpose they serve):
Those various types of instances (i.e. virtual servers) are meant to optimise different components of a server room. As such, among other things that qualifies as targets for optimisation – the most important computer resources are:
1) memory (when it is required fast performance, i.e. for workloads that process large datasets in memory such as in-memory databases optimised for Business Intelligence activities, or applications performing real-time processing for big unstructured data);
2) storage (for storage-intensive tasks that require high, sequential read and write access to large data-sets on local storage – examples: data warehousing applications or high frequency online transactions processing systems);
3) computer processing power (for compute-intensive tasks, such as games or in scientific modelling & machine learning or for media transcoding). For the later purpose (computer processing power) Amazon offers a “Compute optimised” type of instance.
I think you got the picture. Here below there are details about various EC2 instances available:
Still, I did not answer yet the question “What could go wrong?” but wait, soon this will be revealed.
The company has a CIO (Chief Information Officer) or CTO (Chief Technology Officer) or similar being in charge with IT function. If this person is confident from the beginning and he/she assesses the volume of business (based on company’s requirements) as significant – let’s suppose a business of a company at the beginning of its operations, then the architect can pick a c5d4xlarge instance (from the table above).
However, if volume of business was overestimated, then the IT architect might be required by life to accommodate this change. Therefore, he/she might decide to chose a new instance, i.e. one that has a lower capacity (say t2xlarge with only 4 virtual CPU – Central Processing Units instead of 32 virtual CPUs).
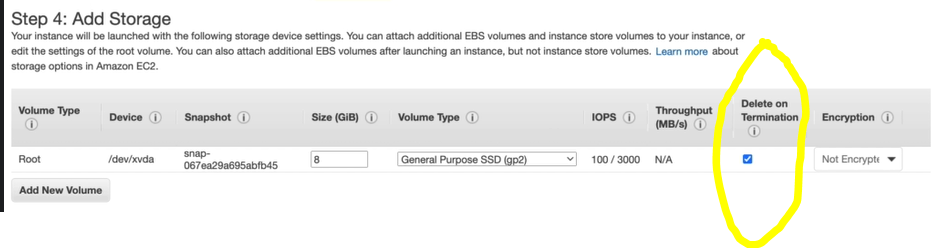
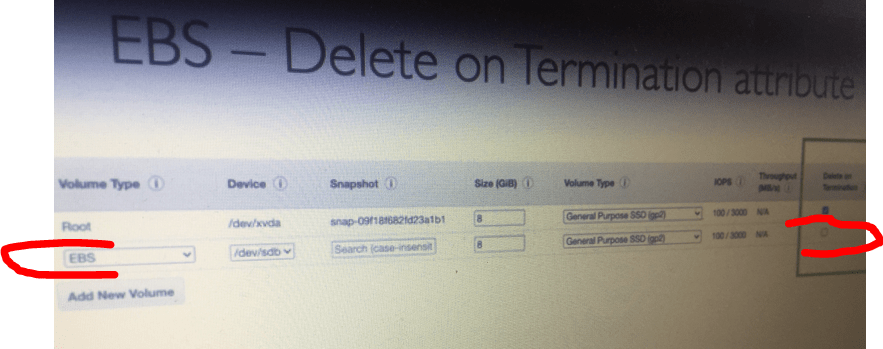
Consequently, the architect will of course terminate the initial instance (i.e. c5d4xlarge), but when that initial instance was created – if the button “Delete on Termination” (see image below) was not ticked, and the architect will not check specifically to delete / terminate also the storage, then we have a problem: the old instance is terminated but not the storage. The later might continue to consume resources.
Or, it may happen that the respective EC2 instance, even though the button “Delete on Termination” was ticked, an additional EBS volume had been attached previously – as a secondary drive (EBS stands for Elastic Block Storage). This EBS volume will not be destroyed when the instance was terminated, so it will keep the data (and consume resources).
Note: for the root volume the button “Delete on Termination” is ticked (by default), but for EBS volume it is not.
Not to mention there is also the option to employ an EC2 hibernate instance. There is a slight chance that such an instace to be also overlooked by the IT architect (if a bad luck, although initially the architeht having good intentions – i.e. to not delete valuable data) and therefore they will continue consuming resources without the company being aware that such an instance is alive (despite the fact that it is not included in the final architecture).
So, as a conclusion a couple of things could go wrong.
Hence the need to control when a budget (or a fraction of it – for example 10% or 20%) is exceeded. If it happens that the respective thresold is exceeded earlier than expected, an automatic email / alert would be an early warning sign and this is exactly what a financial manager of that company needs.
He/she is thus able to ask people in charge why such increase in costs and this is a good start in remediation. Actions to repair what went wrong will be triggered as a result.
It is best to know this before end of month because at the end of month it’s already too late (the bill could be fat and nothing could be done at that stage).
Never enter your IAM API keys into your EC2 instance. Unless you are the single user in that EC2 instance. If not, it’s like not doing yourself a favor, on the contrary.
Some words briefly about the definition of what is an EC2 instance: EC2 instance on AWS it’s a virtual machine or server. But the term “server” it’s not to be understood always as a computer on a rack of servers (typical definition when IT is on premises). A server could be also a piece of software. Many are confused about this term, so I wanted to briefly clarify.
Coming back to the main topic of this article, I was a little surprised to see that Amazon sometimes invites users to do strange things, like this one below:
Basically, they are inviting you to enter your API credentials (API Key and API Secret Key) into an EC2 instance, after AWS said it is “unable to locate credentials”. At the first sight asking this might seem logic.
Think twice. Aaaa …. no way!
Do not enter your AWS credentials using “aws configure” command because when you enter your personal details in an EC2 instance anyone else in your account could connect to that EC2 instance (either connecting using ssh or – for example – using EC2 Instance connect) and that person could retrieve the value of your credentials stored in that EC2 instance.
This is not what you want. Don’t fall that trap.
Instead, use roles (I mean IAM roles).
It seems Amazon woke up one day and realised that security bad practice and issued in its documentation a section named “Best practices for managing AWS access keys” (see the below text). So, you might want to take notice of this section (at the end of the below text there is the link to the source).
Use IAM roles instead of long-term access keys
In many scenarios, you don’t need long-term access keys that never expire (as you have with an IAM user). Instead, you can create IAM roles and generate temporary security credentials. Temporary security credentials consist of an access key ID and a secret access key, but they also include a security token that indicates when the credentials expire.
Long-term access keys, such as those associated with IAM users and AWS account root users, remain valid until you manually revoke them. However, temporary security credentials obtained through IAM roles and other features of the AWS Security Token Service expire after a short period of time. Use temporary security credentials to help reduce your risk in case credentials are accidentally exposed. Use an IAM role and temporary security credentials in these scenarios: You have an application or AWS CLI scripts running on an Amazon EC2 instance.Do not use access keys directly in your application. Don’t pass access keys to the application, embed them in the application, or let the application read access keys from any source. Instead, define an IAM role that has appropriate permissions for your application and launch the Amazon EC2 instance with roles for EC2. Source: https://docs.aws.amazon.com/general/latest/gr/aws-access-keys-best-practices.html.
As a conclusion, it seems simple and tempting to configure credentials in AWS CLI (Command Line Interface) especially when you want to get the job done quickly. But you might not want to do that. Don’t shoot yourself in the foot.
In the present article I am continuing the construction of a trading bot in Python that I am suggesting is able to work 24/7 and to bring a positive result consistently. The goal is to implement no manual trades placed with the crypto-exchange Liquid.com (eventually manual trades will be only on exceptional basis i.e. just for testing the code), but only those originated by several pre-defined triggers (so far my trading strategy has only two criteria: RSI at extremes, i.e. RSI < 25 or RSI > 75 and increase (or decrease) in price by 0.1% from the previous candle – this trading strategy will be subject of further improvements). The code uses mainly the well-known ccxt library.
In the previous article (see PART 2) I have achieved the followings:
Once the “magic” tools (Python and “pip” utility) got installed and after that an open source library named “ccxt” was added (see PART 1), I have continued with opening an account with Liquid.com, created an API token and then I took advantage of reduced trading fees at Liquid exchange (50% discount … 👍 … if the trader has Qash in his/her account and does a proper setting to pay trading fees with Qash)
I have made a code snippet that lists all available pairs at Liquid.com exchange
I have defined my trading strategy
I started to assess two out of four available products in Liquid.com. i.e. Spot Trading and Margin Trading. I have interrupted the previous article at the stage of assessing cost of borrowing funds when Trading with Margin.
I said in the previous article “Let’s hope for the best, but prepare for the worst” because trading crypto-assets i.e. a market in early stages of development is like wild west (too many have reported losses).
I strongly recommend to anyone willing to risk some money in this field (crypto currencies): don’t put more money in crypto-currencies than you cannot afford to lose (don’t borrow money from friends to buy crypto currencies or crypto assets, don’t sell your house, don’t do stupid things like that because crypto currencies markets will eat your hard earned money if you are a beginner in this space and if you don’t do your own research).
One important note: NOT A FINANCIAL ADVICE
I provide no financial advice, if you follow the trading strategy I use in this series of articles you will do it at your own risk.
Personally I put in this experiment an amount of money that I can afford to lose without that such a potential event (if it happens to lose that amount) to have dramatic consequences to my life.
In this article I am going to:
depict the whole process of Margin Trading product at Liquid.com crypto exchange.
continue with coding. So, I am set to achive the goals of trading in an automated way by exploring the ccxt (a library written in Python) and what it can provide as code to allow for Trading with Margin at Liquid.com.
Margin Trading process at Liquid.com
So, for Margin Trading I have to take into consideration two types of interests:
opening interest
daily interest
Liquid.com says on their website: “Both interests have one same rate which is decided by the lender”
The above screenshot is extracted from this link and the same source provides more details about the fee structure, as follows:
Ok, so either maker or taker it’s the same trading fee: 0.13%.
I picked up that range (>= 50k$) because the trading volume will exceed 50 000 USD thresold as a monthly volume. Calculations: I envisage to trade the entire amount of EUR 2000 per day (either in one trade or split it in smaller amounts and place many trades), so I am going to trade an equivalent of 2000 EURO daily, meaning 60k$ per month.
Digging more, I found that the interest rate (for both opening and daily) is not so significant at Liquid.com, so for your convenience I will ignore it for now. But when you sit down and take the pen and see that figures do not add exactly, keep in mind that it’s about this interest rate that completes the picture. You will probaly see I was right in saying those interests (both opening and daily) are not significant compared to the trading fees.
Margin trading it’s trading with leverage. What is this?
The best to understand this is by an example. So, lets suppose I want to place a trade with margin. This means 1) I have an amount of money (let’s say USD 2000) and 2) I borrow in addition from Liquid exchange an equivalent in Bitcoin of USD 2000. This is trading with leverage, the rate of leverage being named “2x” (signifying I place a trade with double amount of money I actually have in my account with Liquid.com).
If that rate was 4x, then I might actually trade with 4 times the amount I own, I mean USD 2000 x 4 = USD 8000.
Of course, there are possibilities up to 25x to Trade with Margin at Liquid.com, but I will not touch those levels for reasons explained in my previous article: such a high leverage will wipe out your funds in a blink of an eye in case you are not sure what you are doing. Currently, although I am not a beginner in trading I am neither an expert. So, I am not certain that my trading strategy will provide a sufficient level of assurance in terms of a higher number of successul trades versus a lower number of bad trades (until actually I test it). Such testing is going to be done somewhere in the future. That is why I will I keep leverage at minimum (2x) for now.
You might ask why to trade with leverage? Is there a need to use 2x leverage? There is no need to use 2x, if there was available leverage of 1.5x I would have chosen 1.5x. Currently Liquid.com has 2x leverage as the minimum option available.
But the need to trade with leverage comes from what I want: to have the possibilty of shorting an asset. This way I can benefit from both increasing and decreasing in price of an asset and make profit even when an asset decreases in price (for beginners this is not so easy to understand, but I will offer more details below).
In fact, shorting an asset supposes that you own that asset. Margin Trading at Liquid.com offers to traders the possibility to borrow that asset (if you don’t have it already) and then short it.
I will explain in detail the whole process with longing and shorting assets.
To long an assets = to buy that asset. This is easy to understand: I dont’ have that asset, but I have USD 2000 and I buy the equivalent in Bitcoin – and I do it NOW (this is important to point out, you will see why).
No need to Trade with Margin in this case. However, I will use 2x leverage and Trade with Margin for the sake of simplicity in implementation of my Python code (besides, 2x is not such a huge leverage, so I am good with 2x).
LONG = I buy NOW and I sell LATER (when the asset will increase in price – hopefully). Profit (in USD) I gain from difference of price nowversuslater.
To short an asset = to sell that asset. I don’t have that asset, so I borrow Bitcoin (from Liquid.com) and then what? Then, I sell it NOW and buy it LATER (when the asset will hopefully decrease in price).
Again:
SHORT = I sell NOW and I buy LATER (when the asset will decrease in price – hopefully).
Profit (in USD) I envisage to gain from the difference of price now (when I sell that asset that was just borrowed, i.e. Bitcoin, and I sell it at a higher price) versuslater (when the asset will hopefully decrease in price), so this way I remain with an additional USD in my account.
Got it?
Remark: if the trader has no money to back up let’s say the quantity of Bitcoin he/she might want to borrow from an exchange (to be used further to short it), there are practically very slim possibilities to short an asset – because you do not get that Bitcoin lended to you if you don’t have a collateral (EURO, or USD, whatever). Therefore, you have to have some money in order to borrow Bitcoin and then short it. Your money will be used by the exchange to cover any loss incurred by your bad trades with borrowed assets (if any). I mean in this setup it’s like you have your money, you borrow more and you trade with the whole amount. Hence the product Margin Trading was born 😉.
I just hope now I have provided sufficient details to anyone willing to understand what I am going to do in my code and why I have chosen to Trade with Margin (i.e. to double my profits by also shorting assets, not only longing them).
Python code (with the help of ccxt) to place a Trade with Margin
The above code is included in the file named: “configAPIks.py”. You might want to replace some pieces of information in the code above, as follows:
API_KEY: instead of ‘9563846‘ – replace with the value of Token ID you have obtained from Liquid.com (see this article I wrote previously).
APY_SECRET: instead of ‘123456 …‘ – replace with the value of Token Secret you have obtained with the same occasion mentioned above.
The file “configAPIks.py” has to be placed in the same folder with the following file:
“placeTradesAtLIQUID.py”
The later has the content that follows below.
START CONTENT:
# Importing other Python libraries into our script / code. To be mentioned that those files that contain Python code (extention: *.py) are called “modules”.
import ccxt
import configAPIks     # this is the file I mentioned above
import time
# API Keys (Token and Secret) needed to authenticate in Liquid.com
bursa = ccxt.liquid({
        'apiKey': api_keyValues,
        'secret': api_secretValues,
        'enableRateLimit': True,
	})
# Function to get the market price of any trading pair available at Liquid.com
def askBid(pair):
	rez=bursa.fetch_markets()
	for i in rez:
		if i['symbol'] == pair:
			j={}
			j=i['info']
			return [j['market_ask'],j['market_bid']]
# The above function provides a list that has two elements, i.e. the ask price and the bid price of the underlying asset (versus USD) at the moment when that function is called.
# Below is the main function to place a trade with Liquid.com either longing or shorting an asset – I have chosen Bitcoin (BTC) and Ether (ETH) as assets to trade and as Funding Currency (I will explain) I picked USDC (a crypto token pegged 1 to 1 to US Dollar, issued by Circle US).
How to use the code for manual trading (just for the sake of understanding the code built so far)
In a new file (let’s say we create the file “manual.py” and place it in the same folder with “configAPIks.py” and “placeTradesAtLIQUID.py” ) let’s put three lines of code:
and … Bam! You placed your first trade with Liquid.com.
Wasn’t that easy?
Let’s depict the parameters of the function named “placeTradeLiquid”, I mean what it is in the paranthesis at the second line of the file “manual.py”:
“buy” means longing the asset. For shorting you can replace this by “sell”
“BTC” is the name of crypto currency (or crypto asset) you want to long. In this case Bitcoin;
0.002 is the amount of Bitcoin you are longing. It’s the equivalent of approx USD 65 or USD 70 (at current prices)
1 is the percent of taking profit, i.e. how much you expect the price of Bitcoin to increase (compared to the buy price) to lock in some profit for you (we are in this for making money, right?);
10 is the percent of Stop Loss (if the trade goes unexpected, how much is the amount of loss – in percentage – of the whole stash you trade with at Liquid.com – by the “whole stash” I mean the entire amount of funds, i.e. formed by your own funds and the borrowed funds);
0.15 is the percent of trailing stop used for buying when the buy order is placed. This is a bit more complicated to explain, but I will do it in the More details section (see next).
Basically that’s all, I mean that was a manual trade you placed through the API of Liquid.com (once again: you placed a trade).
“Trade” – to be more precise – is formed by a buy and a sell. You buy the crypto currency and then you sell it hopefully for a profit (LONG asset) or you sell the borrowed asset and then you buy it (SHORT it) at lower prices (also for a profit) and you return the loan back to the lender.
By the way, the exchange Liquid.com has a list of assets to lend (at various interest rates) posted by lenders that traders use to borrow, but I recommend you don’t bother with this because these borrowing operations and reimbursements are all taking care off automatically for you by Liquid.com (the funds borrowed automatically within a trade are taken in the ascending order of their corresponding interest rates).
More details:
a) Funding Currency = this is the (crypto) currency of your choice used in Trading with Margin. In my example this is USDC (not USD), so a crypto token that is pegged 1:1 to US Dollar. In fact, almost 1:1, because there are slight variations when 1 USD is let’s say 1.001 USDC (sometimes), but this is not so relevant at this point. Funding Currency could be anything, including USD, EUR etc. Basically, from the definition of Marging Trading: “A margin trade is basically a bet, made with borrowed money …“. So, you bet on the increase of price of BTC/USD (Bitcoin versus US Dollar) and you use the Funding Currency (USDC) for that purpose (as a collateral from where the Liquid exchange will cover the loss in case you do a bad trade and lose that bet).
b) Funding Currency is also considered as your money for Trading with Margin. So, you have 2000 USDC and you borrow BTC in equivalent of 2000 USD (“2x”, remember?). And you trade with equivalent of 4000 USD to buy Bitcoin and sell it later (or short it).
c) You probably noticed this line of code: symbol = ETHorBTC+’/USD’, so the trading pairs are either “BTC/USD” or “ETH/USD”. So, you are betting on increase in price of BTC/USD (it could be also ETH/USD) for longing BTC or ETH or you bet for decrease in price (for shorting BTC or ETH) – in all cases with USDC as Funding Currency.
d) In this line of code: client_ordID=’Unique1’+client_ordID2+’Unique2′ you might want to replace Unique1 and Unique2 with some letters or figures upon your choice. This will ensure an order ID is uniqe each time a trade is placed. If the Liquid exchange finds out two orders with the same ID, the second trade is rejected. I made it unique also by what it’s in the middle, i.e. some figures generated by the code based on the time in milliseconds when that trade is placed. Anyway, not much trouble if you don’t change those (because the likelihood to place two orders by two traders that read this article, both ot them don’t bother to replace those Unique strings and each of them places a trade in the same millisecond … is … veeeery low).
e) You can change your leverage here: ‘leverage_level’:’2′. So, instead of 2 you can replace by 4, etc or whatever you want (maximum is 25).
f) Trailing stop. This is a percentage (in our case 0.15%) used when the buying takes place. It’s like this: I see now the market price for 1 Bitcoin is USD 30 000 (supposedly). I don’t buy now (not yet) because I want to maximise my profit in case the price goes lower i.e. under 30k$. When price effectively goes lower (let’s suppose this happens after 1 minute when BTC is USD 29k$ – don’t worry, it will not dump so fast, but I took a rounded figure for the sake of a better explanation), then nothing happens. But when the price from here (29k$ level) increases by 0.15% (this means to USD 29044), then… bam! the buy order is placed. Thus, you will have the trade placed at 1 Bitcoin = USD 29044. So, buying with Trailing Stop gives the trader a chance to buy at a lower price.
REMARK 1: this is a double-edge sword, meaning when the price goes only up after the trader placed the order with trailing stop, it will buy with 0.15% higher (compared to the moment when the order was placed). It depends on what the market does immediatelly after the trader places the buy order.
REMARK 2: there is also the possibility to place a trade without Trailing Stop, i.e. at the Market price. However, if market moves fast, there is a risk of slippage (this I am not going to explain as it’s out of the scope of this series of articles).
g) Trailing Stop is working the same in the opposite direction, I mean when the trader shorts an asset. I guess you can figure out now by yourself how trailing works. Anyway, the trader only needs to input that percentage of Trailing Stop and it’s an automatic process that is taken care off for you by the Liquid exchange itself (not by my code) in both directions: longing an asset or shorting it.
h) Obviously, Take Profit percentage (in our case 1%) as well as Stop Loss percentage (in our case 10%) is taking care off for you automatically, so when price goes up by 1% from buy price, the Liquid exchange does the thing and locks in the profit for you. The same with Stop Loss.
i) Remember: with 2x leverage your Profit or Loss figures are in fact doubled. So, if the trade is going as planned, you gain a 2% profit (2x for 1%) because … remember, you trade also with borrowed money (not only with your own stash). If the trade is not going as planned, your loss is in fact 20% (2x 10%), thus your own stash (USDC, or whatever Funding Currency is used) will decrease by 20% … because … the same argument: you trade with borrowed funds, so 10% loss from the entire amount traded is formed by 10% loss from your own funds and 10% loss from the borrowed funds (but you have to return the full amount borrowed*; hence the additional loss – that is covered from your own funds a.k.a. Funding Currency).
*) As mentioned earlier, Liquid exchange takes care off of this reimbursement (it is done also in the background, being an instant process when the trade is closed).
Recommendation: as a “food” to that function ( placeTradeLiquid() ) you are free to fill in what parameters suits you, according to your appetite for risk. If 10% stop loss is too much, just replace that figure with 5% or less. Or if 1% Take Profit is too low, replace it with a higher figure.
Progress status
So far so good, we have created the main tool to place trades with the crypto exchange Liquid.com, using ccxt library, i.e. the Python function placeTradeLiquid()
👍
Still I have not developed the triggers, so in the next article I am going to attack the code that produces RSI for any trading pair and for any timeframe.
I am happy with the current progress. The ccxt library is damn useful!
Thus, today:
I have explained in detail the product Trading with Margin at Liquid.com crypto exchange;
I created the relevant Python function that is going to place trades; this function is to be used along with several relevant triggers; these triggers are to be set according to the trading strategy envisaged in the previous article; the trading bot (when is ready) is going to place trades 24/7 on both directions, i.e. either longing or shorting Bitcoin (BTC) and/or Ether (ETH), such trades trigerred while RSI < 25 and by an increase in price by 0.1% (for longing crypto assets) as well astriggeres by a decrease in price by 0.1% while RSI > 75 (for shorting crypto assets);
I have explained the parameters to be used when the above-mentioned function is used, including Trailing Stop at buying, as well as what is Funding Currency;
I warned you about correctly evaluating your both (i) target of profit as well as (ii) your limit of losses (hopefully the later will be rare) when trading with leverage (and demonstrated that those figures should be doubled in both cases, i.e. successful trades and bad trades).
About the construction of triggers that will be at the origin of this trading bot that is to work tirelessly 24/7 using the code developed so far: see the next article (PART 4).
In this article (continued from this one) I am going to play with Python a little bit. So, I will check whether a Python library installed previously (ccxt) is fit for purpose. I need to make some GET requests to Liquid.com’s API in order to retrieve some data and send some POST requests to place trades (sell orders or buy orders).
In the previous article (PART 1) I have achieved the followings:
I have successfully opened an account with the Liquid exchange where my trading experience started and created an API token (and a Secret Key) both to be used in my Python scripts;
Python was already installed on both a VPS (Virtual Private Server) and my laptop, and I have installed also the pip utility – useful to add Python open source code that generally is available on github;
and I have installed (using pip) the first open source library, i.e. ccxt – mentioned above i.e. a Python wrapper of REST API, these APIs being available for the majority of crypto exchanges (Liquid.com included).
Also, in this article I will try to define my trading strategy and see what other discounts this cryptocurrencies exchange (Liquid.com) has to offer.
Well, I will start with discounts: Liquid exchange has a huge discount at trading fees upon the condition to buy their crypto token named “Qash” (or coin? … whatever) and allow paying fees with it (I don’t know if Qash has its own blockchain to be a coin or it is a token issued on Ethereum chain, but it does not matter because traders can buy Qash using Liquid exchange). Below an excerpt taken from their site:
“What role does Qash play?
All users are still able to receive a 50% discount on trading fees by paying with Qash. To pay your trading fees with Qash you must have a Qash balance in your Liquid account and turn on the option to pay fees with Qash in your account settings“.
So, one needs to buy a sufficient amount of Qash to cover the trading fees, configure the relevant setting as displayed above and bingo!
You got 50% discount on trading fees for all products 👍
Testing Liquid’s API using Python (ccxt library)
The code below lists the pairs existent on Liquid exchange:
import ccxt
exchange = ccxt.liquid()
exchange.loadMarkets()
listaPerechilor=list()
listaPerechilor=exchange.symbols

for i in listaPerechilor:
     print(i)
When I hit the run button, the above code produces the following output:
That is a list of symbols (I counted 383 elements but above you see an excerpt).
By “symbols” ccxt library means trading pairs.
Therefore, I have successfully tested the connection of my code to Liquid.com’s API and I can obtain (using the mentioned code snippet) all 383 pairs available at Liquid exchange.
If a trader wants to buy Bitcoin and uses his/her available US Dollars for that purpose (assuming this is done through calling the API like I am going to show in this series of articles), then the trader has to use the symbol (trading pair) “BTC/USD”.
To sell Bitcoin and receive the equivalent of US Dollars, the same pair is to be used (of course) but in the opposite direction.
In this series of articles when I write in code a pair to be used further to any of the following activities: (i) place orders, (ii) get an order status or (iii) cancel an order or (iv) update an order, etc etc (to enumerate at least a few basic operations in trading using API) it would be like below:
pair="BTC/USD"
# the variable pair will be used to communicate to Liquid API what
# assets are to be bought or sold
Remark: the code snippet used to list the pairs did not use the API token because … it was not required. API token is something private to each and every trader and the list of pairs is public information.
On the contrary, placing orders using API is private. Therefore, such requests to Liquid’s API need to be authenticated first, meaning the API token created in the previous article (see this -> PART 1) will be used to (privately) manage your orders or checking your balances at Liquid.com exchange.
Available products at Liquid.com. Decisions, decisions … which one to pick?
Let’s analyze first two products:
Spot Trading? Yes, but only when a crypto asset is going up. If you buy and then price goes lower the trader records a loss if he / she sells that asset. So, opportunities are only one way (price goes up) to make a profit.
Margin Trading? As per this link (on Liquid website): “A margin trade is basically a bet, made with borrowed money, on 1) which way a product price will move and 2) how much it will move“.
I like more the “Margin Trading” product because I can take upon both opportunities, i.e. (i) when price goes up (ii) when price goes down. Is there any other possibility? 🤷♂️ Aah … yes: (iii) price doesn’t move.
Really? Nah … price will move. Especially in crypto. You now that joke? Daughter (blonde, sweet and persuading): Dad, I want to buy Bitcoin. Dad: Yes, sweety, of course. How much dollars do you need? Daughter: I don’t know, I just want to have 1 bitcoin as a souvenir (…). Dad: ok, one Bitcoin at …hold on … 35k dollars? So much? Why do you need to spend … (dad looking at the price chart) aaaa .. 36k dollars? I know someone who bought it for less, but now I have to pay … (chart doing its job) … aaaa … 38k $ ?!?
Plenty of volatility in crypto currencies … it’s bad for long term investors because … hmm .. well you don’t know if placing money today, until the year end an investor will gain or lose. Or until end of next year. It’s well known that bitcoin (and crypto market in general usually follows bitcoin) is so unpredictable … but for a speculative trader (this is one of my hobbies) it’s … quite a good chance to accummulate some profit! 👍
However, I am not greedy. I decided that I want to have 1% percent profit. Daily. I think in crypto assets market this is feasible. Won’t you think so?
If no, I understand. You say I am greedy.
Nah … I don’t give up.
If you don’t believe me this is achievable, please take a look at Bitcoin chart. It’s impossible not to take some opportunities for scalping that chart.
Problem is I don’t want to do a manual trading (I don’t have time), but what I am going to do is to start building a code aimed to be running 24/7 that is programmed beforehand to trigger a buy when a few pre-defined conditions are met.
If I buy (on Spot Trading) or I go long in Trading with Margin, after buying I expect a sell order will be placed also by that script. I expect my code to perform a sale when a profit is reached, or to sell at a pre-defined loss (let’s say at minus -15% referrenced to the buy level) if the target price is not reached and price goes so low.
And that’s all. Rinse and repeat.
Stop loss is a tool that is strongly recommended to be used if one is wise in trading, especially in crypto currencies. I want to protect my capital (although 2000 EUR is a small amount and this amount I can afford to lose, still I am going to do my best to not arrive with accounts emptied by bad trades).
Soooooo …… I studied some sources and looked at charts and … the pre-defined conditions to buy will be as follows:
RSI (Relative Strength Index): <= 25
Price increase: 0.1%
The above are two simple conditions that will trigger a buy order (when I will play in Spot and buy some crypto currency / asset or when I am going long on an asset in Margin Trading). They have to be both fulfilled (in the same time), or else there is no buy.
Rationale:
The basics of trading reveal that RSI indicator shows the underlying (crypto) asset (token or coin) is oversold when RSI is below 30 and is overbought when RSI is over 70. This is valid in any timeframe, no matter the trading pair.
The other condition, also valid for all pairs, i.e price to rise up (by 0.1% from the buy level – as compared to the previous candle) always does happen within a cycle. In fact, it happens all the time, but I am interested only when RSI enters the oversold range.
When RSI is going up (from oversold range) this means many traders start to buy, so price goes up quickly.
The second condition ensures buying at a lower price in the cycle. More precisely, I want to catch the moment at the change of trend, so when the price goes low, then RSI goes low too. Price continuing to go low, it comes a moment when price reaches the bottom of that cycle. At this moment (RSI being in oversold range) the price starts to rise and when it is going up by 0.1% (compared to the close of the previous candle) then … bam => buy order is placed.
If you look at majority of trading charts you might notice this pattern. When RSI approaches the bottom of oversold range (meaning price goes also at the bottom of that swing), if you wait a little bit more, there is a change. Then the price is going up quickly, so it is a very short window of opportunity to catch. A bot can help to get the job done and catch that moment (and buy earlier, i.e. when the price is yet no so high) by simply program it adequatelly.
So, the Python code will place a buy when the increase in price is yet a small increase, which I noticed watching charts that it is around 0.1%.
Selling part: hopefully, after placing the buy order the price will go up and the code I am going to build will place a sell order – let’s say – when price is +3% up (referenced to the buy level).
What is still to define – that I a have not yet decided – is the timeframe and the pair. But those are easy to code.
Notes:
The above trading strategy should work on both Spot Trading and Margin Trading. If one choses to trade with margin the difference between trading in Spot and trading with Margin is more profit / more loss when he/she trades with margin. This is because losses happen when market turns in the opposite direction of your trade and if the trader borrows money (this is the nature of Margin Trading product), the loss is larger. Vice-versa, i.e. more profit with Margin compared with Spot trading (when market “behaves”, i.e. the trade is going as planned) it’s also true because you borrow money and make profit also with those funds (besides the profit you make with your own funds).
I know the trading strategy I am going to employ is a not a strong one. A professional trader expects a couple of conditions / indicators to be met plus another couple of other conditions / indicators to confirm a trend change before he/she becomes confident to buy, but I am good with it. So, I don’t expect my accout to go slim, at least not so soon (if it will ever do). But if so, then so be it. This experiment will stop. That’s it.
Although this is not a super trading strategy, I expect to accummulate some profit in my account, but the most important target to be achieved is to have a 24/7 bot running and placing trades (some of them will be winning, some will be losing). Later on I will be tweakening this bot / code until it gives me a satisfactorily profit. If it will ever do that … ha ha ha …
Improvement comes with experience in trading and I think I am gonna gain some experience during this exercise. Not much – because I will not allocate significant time for it (see this series of article that is published during week-ends), but some will mount (hopefully). I am prepared to take also some paid courses on internet – if I can make available more time for this. Finally, I hope at some point to have been added other conditions that need to be meet in order to trigger a buy/long or a sell/short. I am talking about – for example – 1) confirmations of trend change like MAs* crossover 2) other bullish flags like volume increase 3) bullish divergences 4) candlestick patterns and so on. For me the beauty of this experiment is more the automation of such trading, no matter the strategy employed.
Let’s say I have success with the above strategy (hopefully) and first signs are good, profit is reached. I am aware that going further with any trading strategy and before to add more money into it, some tests will have to take place. So, at a later stage I am going to make my homework how this testing is done elsewhere and will employ some form of testing (or backtesting) in this project.
*) MA = Moving Averages. There are three MAs: 9 days, 21 days and 99 days used in trading stocks, but also in trading crypto currencies (I saw all of them defined as such in most crypto-currencies exchanges by default). Details will be provided at a later stage.
Coming back to the products existent in Liquid.com exchange. I look at that option no.2 (Margin Trading). This is with … borrowed money… Hmm … What is the interest on those borrowings? I want to know because an interest is a cost, so profit diminishes. But it shouldn’t be a fortune, right?
Let’s dig in to see exactly how high is this interest (will do this in PART 3).
So far I have completed the below steps:
I took advantage of reduced fees at Liquid exchange and I configured some setting in my account opened with Liquid in order to pay such fees with Qash (50% discount on trading fees …. yeeyee…) 👍
I started to assess the available products at Liquid exchange besides Spot Trading, namely Margin Trading (not decided though if I want to trade with margin or not) because fees are to be assessed (I will do it in the next article) and – most important – trading with high leverage is addicting and if you are wrong on a trade your account could be wiped out (liquidated) easily. Therefore, if I am going to trade with margin I’ll do it with minimum of leverage (I think 2x could be enough for this experiment – I will provide details as this series or articles unfolds) and with Stop Loss (of course).
I have build a small code snippet using ccxt library (a Python wrapper for APIs of 100+ crypto exchanges that includes Liquid.com’s API) that lists all the available pairs at this exchange
I have defined my trading strategy, not a perfect one, but subject of further improvements that hopefully will come along with gaining experience in trading, yet sufficient to get me motivated to achieve the final objective of this series of article: to automate trading by creating a bot that will trade 24/7 based on the underlying trading strategy. With good profits. Let’s hope for the best, but prepare for the worst (crypto is so volatile and a market in early stages of development that one needs to be very, very careful as many reported losses)
I did not place (not yet) any buy or sell order in this article because first I needed to design a trading strategy. Rushing is not my strong point, better to plan twice and execute once. A trading strategy is a must. I am comfortable with learning by doing and the readers might need to be patient enough … because they will be rewarded with a Python code that will be soon shown in its splendor … 🏆 … and will be accessible to all for free.
In PART THREE of this series of articles I am going to continue with this endeavor that is challenging and started already to motivate me because it looks … veeeeery promissing 👍
I wanted to start a trading experience using automation in Python, just for fun and to see if I suck at trading or I gain something. Normally, trading in cryptocurrencies is a high risk activity, but I have decided I can throw a couple thousands EURO in this experiment. Who knows, maybe I am good and I will increase my wealth from trading crypto. If not, at least I gain experience (?!?) 😁 using Python and a couple of things from that exchange.
Why Liquid.com?
In assessing various exchanges, I came across several not regulated (I don’t know why people trade there, they are shaddy – may be they think high risk – high return, so this might be fair enough for me, but I don’t like playing in a no man’s land anyway).
I have made this choice (Liquid) as I saw the following good points:
Official license from the Japan Financial Services Agency as a Virtual Currency Exchange.
Global Leading Fintech Innovators in 2019 no.38 (rated by KPMG)
Ranked consistently among the top 10 regulated cryptocurrency exchanges globally based on daily traded spot volume with deep BTC/JPY liquidity.
At its core Liquid is an institutional-grade exchange that caters to the needs of blockchain projects and consumers alike with access to new markets and fiat (fiduciary currencies, a.k.a. USD, JPY, etc) gateways.
Applied for the Major Payment Institution licence under the Singapore Payment Services Act for the provision of digital payment token services.
The experience in opening an account with them was normal (I got verified, they have Know Your Customer procedure in place – one cannot start trading without to get his/her account verified).
A serious exchange with a satisfactory customer service (English language I used to communicate with them without any problem). Government ID, an utility bill and setting up your bank account details (needed for deposit and withdrawals in dollars i.e. USD) have been the activities requested to start trading.
Python
I have installed Python (version 3.6.4) on both my laptop and VPS (a virtual private server). If one wonders why a VPS, there are a couple of arguments in its favor:
availability of internet connection. When you buy a VPS service, the provider has a very good internet connection that is available 24/7 and it’s up 99,9% of time, including week-ends. Speed is needed to avoid delays in placing a trade. If market turns not in your favor, you might need to react quickly. Any interruption will cost you money. At home, you might interrupt the connection of scripts to internet when let’s say you forgot to plug in the laptop and battery is low (it happened to me quite often 🤷♂️)
a server processes a Python Script more quickly than a laptop. So, I wanted to get data about prices in seconds and sometime on my laptop run many programms (Office with complex Excell sheets, Microsoft Access database, etc) and in addition if I watch a video from Youtube when learning some skills my laptop’s RAM gets overloaded and is running slow.
For installing Python one might want to check the steps I described in my previous post at this link (where you could find – if you are interested – also how to configure a VPS on Windows securely). I made that post when I wanted to ensure continuity of work in running some data collecting information from a couple of hundred websites using a script that take days (see also this link). Looking at that task when started, I noticed in Event Viewer of VPS some brute force attacks (unauthorised attempts to access my VPS from elsewhere), so I have secured that VPS and detailed at the mentioned link how I did it.
But it’s fine if you use the laptop just for a few number of tasks at the same time, the processing CPU is sufficient for trading if you don’t want to manage a database with complex algorhitms.
API (Application User Interface) at Liquid.com and how to use Python to access it
After one opens his account with Liquid exchange and is ready to trade, there is the possibility to create an API token.
API token comes with a secret key when created.
One can use these to trade at Liquid exchange not through its GUI (graphical user interface) i.e. a web browser, but using a script to connect to the REST API (for details regarding that API check this link).
Below there are some screen-shots for creation of an API token at Liquid.com exchange, as well as a screen shot from documentation (see the above-mentioned link).
Remarks:
Strongly recommended is to keep that API token and Secret Key private. Anyone that has access to those two pieces of information can theoretically place trades and makes you bankrupt (unless you do it yourself … ha ha ha …)
I have left unticked the withdrawal possibility using API. Unless you know what you are doing, strongly recommended is also to untick them.
I left the IP restriction untouched. This is NOT recommended, but I have not decided yet where I want to trade from (tablet, VPS, laptop or phone). In case of tablet or phone usually the GSM provider cannot ensure the same IP when I use them. The IPs are changed upon criteria I cannot figure out. After I have a full automation (to code a script that will run from my laptop or 24/7 from my VPS), I will most likely add an IP and this means I cannot trade from other IPs except from that one that is added in Liquid settings.
At this link I have explained about the pip i.e. an utility that can aid at installing various Python libraries from github or from elsewhere (I like to integrate the work of others that aid in getting my job done more quickly – why to reinvent the wheel?).
So, I can simply install a new library from github with the following command at the Windows run -> cmd:
and the relevant (open source) Python library gets installed on my laptop (Windows 10). Under the hood some files are automatically downloaded from github and installed in the relevant folders of my laptop. The process is transparent and quick.
For my purpose of trading at Liquid exchange I have installed ccxt (a library available for almost 100+ crypto exchanges), as follows:
C:\WINDOWS\system32>pip install ccxt
So far I have completed the below steps:
open an account with the relevant crypto exchange where my trading experience will start (Liquid.com)
(previously I have installed Python version 3.6.4 on both a VPS and my laptop, as well as the pip utility – useful to add Python open source code generally available on github)
and I have installed ccxt (a Python wrapper of REST API, these APIs being available for the majority of crypto exchanges that want to get volumes from traders that have some tools to automate trading, like me).
In PART TWO of this article I am going to start using these tools to place orders on Liquid exchange using a Python script.
Deadline to submit the file to Romanian relevant authority is 17 December 2020.
It’s for companies in the industries offering essential services (mainly energy utilities, banking, payments services, etc)
Legal background:
Law 362/2018
Why deadline is 17 December 2020?
Because all related legal acts / governmental orders and so on have been culminated with HG 976/12.11.2020 published in Official Monitor as of 17 November 2020 and a stipulation says that legal documentation / complete file has to be submitted in 30 days (so, 30 days since 17 November 2020 is 17 December).
What if not complied with?
Companies have to make an analysis on their own and if qualify – according to the law – as providing / rendering essential services (mainly in industries as energy, banking, payment companies, etc), then they have to complete a file and submit it to relevant authority.
There are more to say, for example if the delivery of such services depend on a computer network and if they can suffer from a possible unavailability of such a network (in case of a security breach) then they qualify. If not dependant on a computer network to deliver the essential service yet they have to contact the relevant authority to be told if other criteria may make the company qualify for delivering essential services under the risk of unavailability in case of various events happen.
Pay attention: the penalties for not compliance are not small. So, if your company qualifies for the regulation, but if it is unaware about such legislation and does not do that internal analysis (and further to such analysis the conclusion is that it might be qualifying), the relevant State Authority may still check upon that company after deadline.
Scriu cele ce urmează după ce am lecturat de 3 ori propunerea de OG privind înființarea Directoratului Național de Securitate Cibernetică și pentru modificarea și completarea unor acte normative (la această oră nu știu dacă a fost aprobabtă). Am rezonat de prima dată de cînd am citit despre această inițiativă: este nevoie de un singur „creier„ care să deseneze viziunea, strategia, aspectele ce țin de conformitatea securității. Astăzi însă constat că, așa cum este scrisă propunerea, există posibilitatea să asistăm la nașterea unui monopol de stat („DNSC poate înființa, în condițiile legii, în numele statului, societăți cu capital de stat în România și în străinătate. De asemenea, DNSC poate participa, cu respectarea cadrului legal în vigoare din domeniul societar la majorarea capitalului social al societăților la care exercită, în numele statului, calitatea de acționar.„) Sau poate înțelegerea mea este greșită în lipsa unei dezbateri publice pe acest proiect…
Business: provides services in trading digital assets. It was done already such a business.
Amount: 117 millions US dollars. It was done before, such amount is not unachievable.
So what is new?
SEC (Securities and Exchange Commission)-approved IPO is the first of its kind: investors can pay in Bitcoin (BTC), Ether (ETH), and USD Coin (USDC) – these are crypto-currencies.
Since launching the IPO, INX (the start-up company) raised $7.5 million by Sept. 10, the firm’s representatives said.
More than 3,000 retail and accredited investors registered for the INX token offering in the first three days.
Yes, that’s right. You read it correctly: a token. This is a new form of investment instead of shares or bonds or other equity form.
For those unfamiliar, a token is a form of digital assets that stays on a blockchain (a specific type of distributed databases network), is transferred back and forth over a blockchain and is issued electronically using a smart contract (a piece of software that is a feature of the blockchain).
So, no more need for papers, approvals, stamps, formalities and other similar stuff. Also, no more need for brokers. Investors can trade tokens using digital assests exchanges.
More precisely, this is a hybrid of IPO and security token offering (STO) that is registered with the SEC (a registration statement relating to the offering of these securities was declared effective by the SEC on Aug. 20), allowing everyday investors to legally participate in it.
The funds raised from the sale of INX tokens will be used to launch a multiservice digital asset platform. A regulated crypto trading platform for crypto, security tokens and their derivatives is intended to be created, as well as to launch a cash reserve fund.
STO (Securities Token Offering): Why is this a big deal anyway?
Because crowdfunding in a digital form takes place now in a regulated form.
Why was not regulated so far?
Because innovation was a step ahead of regulatory activities and this is since ever I would say. Blockchain as innovation makes no exception. Yes, the form not regulated was ICO (Initial Coin Offering)
In order to understand what an STO is, one must first understand ICO. The latter refers to a token offering from a company or organization in order to raise capital for a project. Buyers are issued with digital tokens. Unfortunately, ICOs are largely unregulated, thus putting investors at risk.